The battle of the breads: split-top versus round-top. Which one takes the cake? Let’s find out.
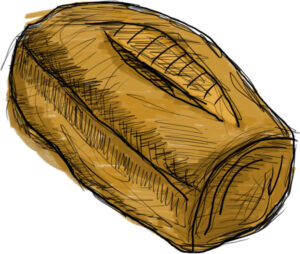
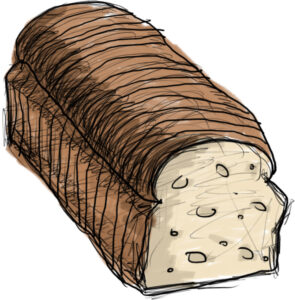
I recently visited a renowned bakery and was in awe of all the beautiful breads on display. One of my favorites was a hearty multigrain sandwich loaf studded with seeds and a large split down the middle.
This got me thinking… why is it that fresh bread from the bakery often has this distinctive split top, while most commercial grocery loaves are perfectly symmetrical with a rounded top? Better yet, what causes that crackly split top in bread? And does a split top make the bread taste better?
In this article, we’ll dive into what causes the distinction between split-top vs. round-top bread and whether it affects structure and taste.
Making Split-Top Bread
To achieve that signature bakery-style split top, you need to score the bread. Scoring is a simple technique that involves using a lame (pronounced “lahm”)—essentially, a thin razor blade—to make a cut in bread dough prior to baking. If you don’t have a lame, you can also use a food-safe razor or a sharp knife.
The purpose of scoring is to control expansion in the oven. Without scoring, a loaf of bread may expand unevenly leading to a misshapen loaf.
In the case of sandwich loaves, scoring is usually one long cut down the middle, which results in a split-top loaf. But the same technique can be applied to round boules, creating an X-shape in the center. Sometimes it’s a more intricate design, primarily for decoration.
Besides aesthetics, scoring has a more scientific purpose: to make the bread expand evenly for an even crumb. Creating these marks in the top of the bread also allows steam to release which contributes to an even texture and structure throughout.
Giving Your Loaf a Round Top
Bread with a perfectly round top is often made in a pan. This can be a rectangular loaf pan for making sandwich loaves, or a round cast iron pan for making boules.
Rather than relying on score marks to control the expansion, the sides of the pan force the bread to expand upwards as it bakes. To achieve a perfectly rounded top, it’s important to shape the dough into a perfectly smooth shape with no wrinkles.
Making round-top bread is a difficult task for a novice baker. Without scoring to release steam, bread is prone to cracking. The crust usually begins to harden before the structure of the bread is set, so steam can break through the crust, creating cracks and bulges. So, if this has ever happened to you, scoring may help prevent this.
Commercial sandwich bread gets its perfectly round top through the Chorleywood Bread Process, which incorporates emulsifiers and other additives to speed up the bread-making process. This process also results in a soft and symmetrical bread loaf but has negative effects on nutrition.
Split-Top vs. Round-Top: Is One Better?
A split-top is not necessarily an indicator of the quality of bread, nor is a round-top. I will say that scoring is a technique often utilized at good bread bakeries, whether that be split down the middle or otherwise.
Some people think the split vs. round top affects the texture of the crust, but this is not entirely true either. This has more to do with the moisture content of the bread, added ingredients, and baking techniques, such as introducing steam.
Applying a wash—another finishing technique that involves covering the exterior with a combination of eggs, water, milk, and/or cream—also affects the appearance and texture of the crust.
Scoring may give the illusion that bread is more rustic or artisan, and therefore, superior. However, this isn’t always the case. You can find commercial split-top bread in the grocery store that isn’t necessarily high quality. It’s just a marketing technique to make consumers think it’s more natural. You can do the same thing at home to give your bread a rustic look.
Bread Baking 101
If you’re interested in continuing your quest to make the best bread, let’s start with the basics. What exactly is bread? A basic definition is a combination of flour, water (or other liquid), salt, and yeast, kneaded into a dough, allowed to rise, and baked.
Of course, there are many different types of bread, varied in size, shape, texture, and taste. For example, enriched breads—like challah, brioche, and potato bread—have added ingredients like eggs, milk, and sugar, which makes them sweeter and richer with a softer texture. This is opposed to lean bread—like baguettes, ciabatta, and rustic boules—that contain only flour, yeast, water, and salt.
There are also different types of yeast, which affect a bread’s taste. Baker’s yeast is available either live (also known as fresh yeast) or dehydrated (active dry or instant yeast). Sourdough, on the other hand, gets its distinctive tangy flavor from wild yeast (rather than baker’s yeast).
Aside from taste and texture, bread doughs can be formed into an array of shapes and sizes. You can make sandwich loaves and sub rolls from the same dough, the only differences being the portion size, shape, and cooking time.
The 9 Steps to Making Great Bread
No matter the subtleties among different types of bread, the process of bread-making follows the same basic steps:
- Make Dough: Activate the yeast and knead ingredients together to develop gluten.
- Proof: This step is also known as the first fermentation, first rise, or bulk fermentation. Place the bread dough in a warm, humid spot such as a proof box, and allow the yeast to work its magic. The bread dough expands during this step, usually doubling in size.
- Scale: Punch down the dough, then divide the dough into portions (per individual roll or loaf). The process of scaling is also called portioning.
- Pre-Shape: Roughly shape the dough into its final shape. For example, small rounds for buns or long cylindrical logs for baguettes.
- Rest: Allow the dough to rest for about 15-20 minutes to relax the gluten. This makes it easier to shape.
- Shape: Form the dough into its final shape.
- Proof: This is also called second fermentation or sometimes final fermentation. The dough will expand slightly and become lighter and springy.
- Apply Finishing Techniques: This optional step is where you’d apply a wash to enhance the crust or score the bread using a lame, razor, or sharp knife.
- Bake: Place bread in a preheated oven and bake to an internal temperature of 190-210°F (88-100°C).
Depending on the type of bread, there are sometimes additional steps involved. Some lists go into further detail, outlining the sub-steps of each of these primary steps. But my hope is that this list gives you a basic understanding of the process all yeast breads go through.
What to Remember
In conclusion, split-top bread isn’t necessarily better than round-top bread, but it is visually appealing. It’s also a smart method of bread baking since scoring the bread to create a split top controls the expansion and results in a more even texture throughout.
Remember that split-top vs. round-top isn’t an indicator of quality though. To judge the quality of bread, look to the source and its ingredient list instead. Bread with a shorter ingredient list and containing only natural ingredients will generally be of higher quality (and taste better too!)
