There’s more to not burning the food in your frying pan than not turning away from the stovetop, and it starts with your choice of cookware.
When you first start cooking on the stove, learning how not to burn the pan can be tricky. You turn away for a moment, and, as soon as you look back, your food is charred, and the bottom and sides of your cookware have blackened.
Burning the pan—as you’ve probably seen first-hand given that you’re here and all—is nothing to be excited about. It not only makes clean-up harder, but it destroys the rich, natural aromas and flavors present in your food, imparting it with a burnt, acrid taste instead.
The good news is that there is a way to prevent this, which is exactly what you and I will be talking about in this blog post.
To avoid burning the pan, use a high-quality, thick-bottomed skillet greased with cooking oil. Cook over medium to medium-high heat coming from an appropriately-sized burner or cooking zone.
There’s a difference between browning your food, caramelizing it, and burning it.
Understanding that difference, even though television chefs and cookbook authors sometimes use the first two terms interchangeably, is what it takes to learn the ropes of stovetop cooking.
How Stovetop Cooking Works
Stovetop cooking works thanks to three chemical reactions that take place on the surface of your food, sequentially, at high heat: browning, caramelization, and pyrolysis.
Pan-fried food tastes so good thanks to the first two, browning and caramelization. Burnt food is unhealthy and tastes bad because of pyrolysis, which you should try to avoid at all cost. So here’s how to achieve that, and what else you need to know on the topic.
Browning:
Browning is what happens when the sugars and proteins in your food fuse and clash, creating hundreds of new aromatic and flavorful molecules that give it a rich smell and a savory taste.
Browning is also known as “the Maillard reaction,” a chemical chain of events named after the French chemist Louis Maillard who first described it in the 1900s. It starts at 284°F (140°C) and peaks at approximately 320°F (160°C).
The Maillard reaction is the reason why seared steak, toast bread, and roast coffee have such an appealing smell and a delightful, full-bodied taste. The fact that it can’t happen in water is why chicken tastes so different when pan-fried or grilled than when boiled or sous-vide.
Caramelization:
On the other hand, caramelization is what happens to sugar when it gets heated to 338°F (170°C). Just like browning, the sugars break apart and generate hundreds of new flavor and aroma compounds. Think of the crunchy layer of caramelized sugar that tops French crème brûlée.
Though television chefs and cookbook authors sometimes use browning and caramelization interchangeably, they are actually two different things. And, as explained by Cook’s Illustrated magazine, they yield entirely different aromas and flavors.
Pyrolysis (burning):
At a cooking temperature of 356°F (180°C) and over, another chemical reaction called pyrolysis—or burning—takes over from browning and caramelization. Pyrolysis destroys aroma and flavor and produces compounds potentially harmful to your well-being.
Why There’s No Need to Cook Over High Heat
You want to cook your food to the extent that it browns and caramelizes, but never to the threshold where it starts to burn. To get there, cook over medium to medium-high heat, as it gives you the most control over the cooking process.
Contrary to what most home cooks think, you seldom need to use high heat. When pan-frying, no matter in what amount of cooking oil or fat, it will burn your food on the outside while leaving it undercooked on the inside.
The only time when turning the heat dial on your stove all the way up to high makes sense is when you have too much liquid in your pan—and you want to simmer it down faster by evaporating more of it.
Your Frying Pan Matters More Than You Think
When you’re pan-frying on the stovetop, you want a thick-bottomed, fat-sided skillet that’s capable of holding on to heat and distributing it evenly, without cold and hot spots.
Cheap, lightweight pans just don’t cut it. They don’t heat uniformly, so they’re prone to burning your food in spots while leaving it undercooked in others. So get yourself a carbon steel, cast iron, or stainless steel skillet (copper pans are also a fantastic choice, albeit pricey).
This is especially true for coil, radiant, and induction cooktops, which have a thermostat that turns the coils or zones on and off as they reach a certain temperature. On a gas range, the flame is constant (and that’s why many chefs swear by cooking on gas).
Cooking oil not only keeps food from sticking to the bottom and sides of the pan but also helps to spread heat more evenly. So, whenever you fire up the stove, remember to spread 1 tablespoon of cooking oil on your skillet’s cooking surface with the help of a paper towel.
Use an Appropriately Sized Burner
It goes without saying that, if you place your pan on a burner that’s too wide or too narrow, you will get uneven heating—and you’ll probably end up burning your food.
Not only that, but an overly big or small burner can warp an otherwise good frying pan. All metals expand and shrink as they heat up and cool down. Exposing a cooking vessel to an amount of heat it’s not designed to handle can cause it to bend and twist beyond repair.
The general rule of thumb at play here, then, is always to match the diameter of your frying pan to that of your burner when cooking on the stove.
Will All of This Work?
Yes, but not necessarily in the way you expect it.
Unless you cook on a non-stick or ceramic skillet, which keep food from sticking to them in the first place, a certain amount of food residue will almost always build up on your pan as you cook with it.
The goal, though, if your food to come out browned, caramelized, and evenly cooked, and for the food residue left on the bottom and sides of the pan to be brown to dark-brown in color.
That gives you a choice between cleaning the residue off (using the technique that I’m about to show you below) or making pan sauce by deglazing your pan. Yes, I’m talking about the same kind of pan sauce that the chefs of high-end restaurants pour over a perfectly cooked steak or a butterflied chicken fillet.
If that sounds like something you want to learn how to do, head on over to that post I just linked to. If you just want to get cooking over with and clean that burnt pan of yours… well, let’s say I’ve got you covered, so do keep on reading.
Cleaning a Burnt Pan
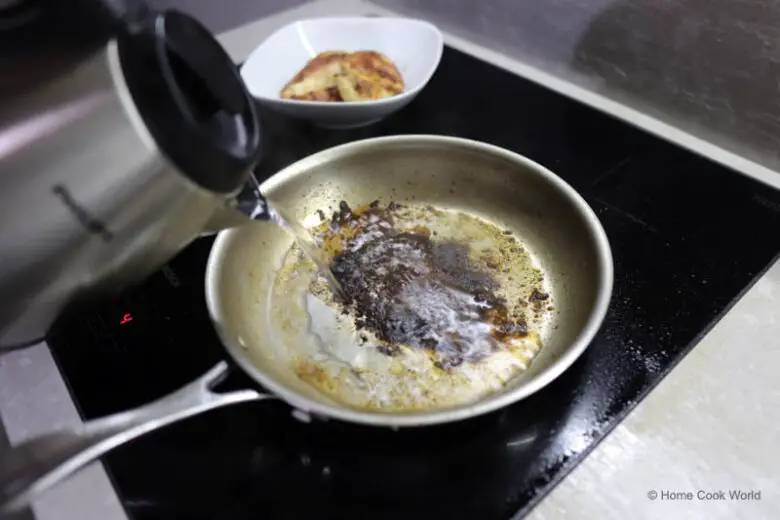
There’s no need to put in a ton of elbow grease to clean a burnt pan. Those burnt bits and pieces of food stuck to the bottom and sides of your pan are, in fact, easier to get rid of than most of you probably think.
Simply allow the pan to cool down for 5-6 minutes, so that it won’t splatter all over your range, then fill it with enough water to cover the burnt spots. Bring that water to a boil, let it stay that way for 2-3 minutes, and scrape off any leftover residue from the pan using a silicone or wooden spatula.
Don’t use a metal spatula for this as you’re likely to scratch and damage your pan’s cooking surface. Some bloggers out there will instruct you to add white vinegar or baking soda, but, in my experience, that’s overkill. More often than not, boiling water for a few minutes is all it takes to clean a burnt pan.
Let the pan cool down. To make it spick and span again, give it a good soap down under running lukewarm water in your sink or put it in your dishwasher and let the appliance work its magic.