No cast-iron skillet? No problem! This foolproof way helps you cook juicy, flavorful steak in any pan, every time.
Flip through the pages of any good cookbook, and—when you get to the recipes for thick-cut steaks—you can’t help but notice one thing. When on the stove, they all call for a heavy-bottomed, thick-walled cast iron skillet.
It makes sense, you know: a cast iron skillet holds heat well and distributes it evenly. The result is a steak with a perfect sear and crispy crust, the kind you’d eat at a steakhouse, every single time you fire up the stove, heat that skillet up, and cook in it.
The question is, how do you cook a steak if you don’t have cast iron in your kitchen?
Yes, you can cook a steak without a cast iron skillet. Bring the steak to room temperature, then oil and preheat your frying pan over medium-high. Sear the steak for 1-2 minutes per side, then reduce the heat to medium and continue cooking the steak to your desired doneness.
When you’re preparing a steak, no matter the cooking vessel, you want to achieve two things:
First, you want to sear the steak on the surface, which gives it a meaty aroma, deep flavor, and crispy crust. Searing works best when room-temperature meat comes into sudden contact with a hot cooking surface.
A steak should be seared only briefly until a crust forms and the color turns golden brown. Steak that’s seared too long is a burnt steak. It’s easy to tell the difference: a burnt steak is charred and not browned; it tastes acrid and not appetizing.
Second, you want to give the protein enough time to cook through on the inside, so that it doesn’t come out bloody and raw. All meat cooks from the outside in, and it takes time for the heat to get to the center.
Once the outside of the steak is well seared, reduce the heat to medium and finish cooking the inside. The steak is done when you measure the internal temperature with a meat thermometer and it has reached at least 145°F (62.8°C).
Temper Your Steak
Always bring your steak to room temperature first by removing it from the fridge and resting it on the counters for 15-20 minutes. If you’re wondering if this is safe, fear not; meat, raw or cooked, can be left to sit out at room temperature for up to 1-2 hours.
Professional chefs call this technique “tempering.” By reducing the temperature contrast between the heat of the frying pan and the temperature of the protein, it allows the meat to cook faster and more evenly.
For the same reasons, you should never cook a steak from frozen. If you keep a supply of frozen steak, as any carnivore should, transfer the steak from your freezer to the bottom shelf of your fridge and thaw it in there overnight.
Oil Your Pan
Fats and oils serve three purposes in cooking. First, it transfers heat. Second, it dissolves and concentrates the aroma and flavor compounds in food. Third, it keeps the food from sticking to the bottom and sides of the frying pan.
Simply put, you not only need to use cooking oil; for best results, you actually want to use cooking oil.
Since you are searing the steak over relatively high heat, you should add 1-2 tablespoons of cooking oil with a high smoke point. My favorites are avocado oil, rice bran oil, and canola oil. Spread the oil evenly over the surface by lifting the pan and giving it a good swirl (or use a paper towel).
Preheat Your Pan
Although preheating a pan is a straightforward task, a few ground rules apply.
For searing meat, use medium-high heat. Medium heat cooks the meat too slowly and the sear takes forever. High heat is too intense and will char and burn the crust, no matter how careful you are.
Ceramic and non-stick pans consist of aluminum bodies sprayed with sol-gel (ceramic) or PTFE (non-stick) coatings. Aluminum is an excellent conductor of heat, so this type of cookware requires only 20-30 seconds to preheat.
Stainless steel pans actually consist of a rust-free, stainless-steel exterior bonded to a disc (on the bottom) or core (on the inside) of aluminum or copper. Stainless steel is a poor conductor of heat, so it needs the help of another metal to heat quickly and without cold spots. Most stainless steel pans take 2-3 minutes to get up to heat.
Salt and Sear the Steak
Salt the steak generously on both sides. I prefer to use kosher salt, fine sea salt or pink Himalayan salt as they aren’t iodized and, since they’re iodine-free, they don’t impart a weird flavor onto the meat.
Slap the steak in the hot pan. You know the pan was hot enough when the moment the bottom of the pan touches the side of the steak that’s facing it, you see the meat smoking and you hear it sizzle.
Sear for 1-2 minutes on one side, then turn to the other side and repeat the process. Allow the steak to brown on each side without interruption and don’t poke, press, or try to move it during this time; doing so is counterproductive to the sear.
Cook the Steak Fully Through
Once the steak has a crispy crust and a golden brown color, the sear is more or less done. Reduce the heat to medium and continue cooking the steak to your desired doneness.
There’s more than one way to determine when steak is done. However, by far the most accurate method is to use an instant-read thermometer. Simply insert the tip of the probe ½ inch deep into the thickest part of the meat and wait 2-3 seconds to get a reliable reading.
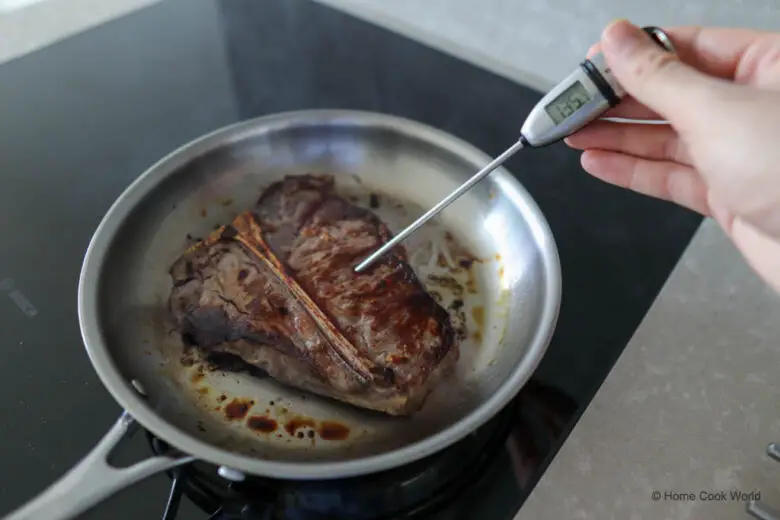
According to the Food and Safety Inspection Service at the U.S. Department of Agriculture, the safe internal temperature for beef, veal, pork, and lamb is 145°F (62.8°C), with a minimum resting time of 3 minutes.
During the rest period, the steak finishes cooking in its residual heat. An added benefit is that the juices settle—and don’t run out when it’s cut. Resting a steak produces such a good result that many cooks rest theirs for 5-10 minutes after removing it from the heat, especially for thicker cuts.
