You made homemade pizza and you did everything the recipe said. Despite that, your pizza came out crusty and dense—not light and airy. This used to happen to me over and over again years ago until I finally got tired of my pizzas looking nothing like the photos in the recipes. So I set out to learn how to make pizza and troubleshoot pizza dough.
If the same thing happened to you, what went wrong?
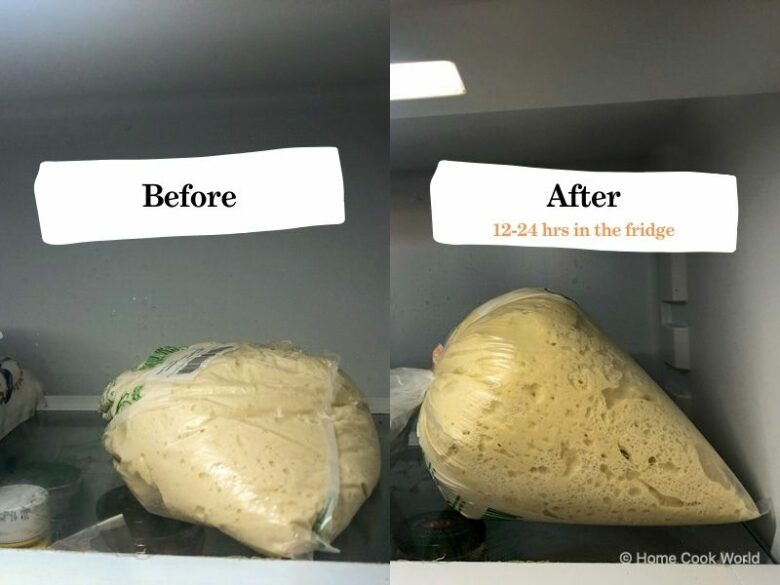
If you don’t let the dough rise long enough, your pizza will become dense and indigestible. To make your pizza airy and fluffy, knead the dough the day before, shape it into a ball, place it in a bowl covered with plastic wrap, and store it in the refrigerator for 1-2 days.
The two most important ingredients for making pizza that few recipes tell you are plenty of time and a steady temperature.
Pizza dough is a yeast-risen dough traditionally made of flour, water, yeast, salt, and, optionally, extra virgin olive oil. To make pizza dough, you mix the ingredients and knead the dough (by hand or using a stand mixer).
An essential step before shaping, topping, and baking the pizza is called “proofing.” Proofing is the time you give to the yeast to start feeding on the dough and making it rise by creating small pockets of air inside it.
Yeast is a microorganism comprised of a single cell that needs warmth, moisture, and nourishment. When you let dough rise, the yeast cells feed on the starches and sugars in the flour and replicate.
At this stage, they start to feed on the sugars and starches in it, producing carbon dioxide and ethanol in the form of gas bubbles as a byproduct (this process is also known as “fermentation”).
These gas bubbles get trapped in the dough, making it rise as they continually build up inside it. Well-risen dough is light and airy because the yeast has been given enough time to replicate and feed.
Proofing = Time + Temperature
The second most important factor for your homemade pizza dough is the temperature of the dough (and of the air that surrounds it). Temperature affects the metabolic rate of yeast, which affects how fast the cells reproduce and feed.
Most of the time, you’ll let your pizza dough rise at room temperature, which is typically about 70°F (21°C). Hotter temperatures lead to a quicker rise and colder temperatures lead to a slower rise.
If you take two identical dough balls made from the same batch of dough, letting one rise in a warm place and the other in the fridge for the same amount of time, the dough ball in the warm place will have risen significantly more than the one in the fridge.
Proofing does two things to your pizza dough: (1) it makes it light and airy and (2) it enhances its aroma and flavor.
But be careful; you can overproof a dough by letting it rest for too long. The dough will become too alcoholic and sour. Ultimately, the dough will collapse because the yeast will produce so much gas that the protein in it (the gluten) will no longer be able to hold it together.
When you’re proofing dough, you’re looking for that “sweet spot” where the dough has had enough time to rise and develop flavor, but not too much so that it gets too fermented and sour. Typically, that happens for to 4-6 hours at room temperature and 1-2 days in the fridge.
The biggest mistake home cooks make with homemade pizza is that they don’t let the dough rise for enough time at the right temperature. Remember these two factors, time and temperature, and learn how to use them to your pizza dough’s advantage.
Most recipes will tell you to let the dough rise for 30 minutes. If you ask me, that’s just not enough time for the dough to develop a texture, aroma, or flavor. To make light and airy pizzas, you need to be more patient and give the baker’s yeast enough time to do its job.
I like to make my dough a couple of days ahead and give it enough time to rise in the fridge. This develops a dough with a rich aroma and complex flavor that no quick rise will give you. I know this requires some planning in advance, but take me up on my offer and you won’t be sorry.
Is Your Dough Hydrated Enough?
Sometimes, a pizza will come out airy, but overly crusty. Here’s why that happens.
The hydration of your dough can also make or break your pizza’s lightness. It’s important because water evaporates at high heat.
The longer you bake your pizza, the drier it will come out. A dough with the right level of hydration will ensure that your dough comes out neither too soggy nor too dry.
The hydration of a dough is the total amount of water relative to the total amount of flour, expressed as percent:

Suppose you made dough with 600 milliliters of water and 1,000 grams of flour (while milliliters and grams are generally not interchangeable, they are if you’re measuring water):

In other words, your dough would have a hydration of 60%.
Shoutout to Gill, who caught I mistake I had made in the formula in the earlier version of this article and helped me correct it by leaving a comment below! You can tell why I became a home cook and not a hobby mathematician 🙂
Most recipes will tell you to make a dough with a hydration of 60%, which is the right level for a wood-fired pizza oven, but not moist enough for the typical home oven. Since homemade pizza is meant to be baked at a temperature of 500-600°F (260-315°F), the best hydration for the dough is 70-75%.
A brick oven works at a temperature of approx. 800°F (427°C) and can cook a pizza in as little as 60-90 seconds. The typical home oven with a pizza stone or steel goes up to a temperature of 500-600°F (260-315°F) and will bake a pizza for 10-15 minutes.
10-15 minutes is a long time compared to 60-90 seconds, despite the significantly lower temperature. If you make pizza dough with hydration intended for a brick oven but end up baking it in a home oven, the pizza will come out crusty and dry.
Crusty and dry 
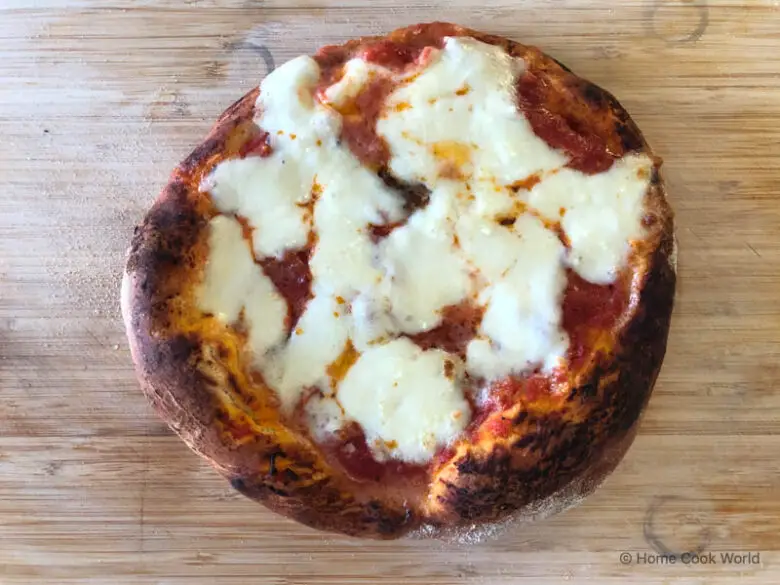
Airy and hydrated
What’s your favorite dough hydration? I’ve read some home cooks go as high as 75-85% and be very happy with how their pizza came out.
Conclusion
The simplest foods are often the hardest to make, and pizza is no exception to the rule. If you made pizza and it came out thick and dense, don’t get discouraged. Cooking is all about experimentation. And the more you know why food works the way it does, the better your experiments.
Now that you know that yeast fermentation is what makes your dough light and airy, try proofing it for a longer time the next time you make homemade pizza. Sometimes, you get the “airy” aspect right, but the pizza comes out too crusty. If that happened to you, make higher hydration dough (my favorite is 70%).
